In the following example, we will create a renaming tool from scratch.
TIP
Before starting, it is highly recommended to install the Better autocomplete mentioned here and set up the environment, so that all code, whether in Python or Json, has automatic prompts, which can greatly improve development efficiency.
For a minimal example of a tool with a UI, see Minimal Tool Example
Directory Structure
In the File Path Structure, we have introduced the path of TAPython in the Unreal project and the functions of various files. Now let's focus on the part in
    Your_UE_Project
    ├── Content
    ├── ...
    ├── Plugins
    └── TA
        └── TAPython
            ├── Config
            ├── Lib
            ├── Python                           # 0) <--- Python root directory
            |    ├── ...
            |    └── DemoTool                    # 1) <--- Individual tool directory
            |        ├── __init__.py
            |        ├── rename_tool.py          # 2)<--- Python code file
            |        └── rename_tool.json        # 3)<--- UI file
            └─ UI
                └── MenuConfig.json              # 4)<--- Configure the menu item to launch the tool here
Steps
1. Create directories and files
Create the new tool's directory, DemoTool (you can choose a different name if you prefer), following the directory structure shown above.
In the DemoTool directory, create the following three files:
- __init__.py
- rename_tool.py
- rename_tool.json
These files are the Package definition file, the Python tool logic file, and the UI file, respectively.
2. Configure the menu item to launch the tool
Open the MenuConfig.json file and add an item to the OnToolBarChameleon's "items" section:
    {
        "name": "Demo Rename Tool",
        "ChameleonTools": "../Python/DemoTool/rename_tool.json"
    },
After:
MenuConfig.json
{
    ...
    "OnToolBarChameleon": {
        "name": "Python Chameleon on toolbar",
        "items": [
            {
                "name": "Demo Rename Tool",
                "ChameleonTools": "../Python/DemoTool/rename_tool.json",
            },
            {
                "name": "Minimal Example",
                "ChameleonTools": "../Python/Example/MinimalExample.json",
                "icon": {
                    "style": "ChameleonStyle",
                    "name": "Flash"
                }
            },
            ...
        ]
    }
}
After completing step 3, clicking the menu item will open the tool's UI.
3. Edit the UI file
Open the newly created rename_tool.json file and add the following content:
rename_tool.json
{
    "TabLabel": "Rename Tool Demo",
    "InitTabSize": [380, 200],
    "InitTabPosition": [200, 200],
    "InitPyCmd": "",
    "Root":
    {

    }
}
Key Points
"TabLab"defines the tool tab's title"InitTabSize"and"InitTabPosition"define the initial size and position of the tool, respectively"Root"defines the content of the panel's widgets, which are empty at this stage"InitPyCmd"is used for initializing the tool's Python code; leave it blank for now and complete it in step 4
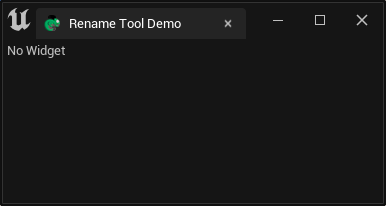
At this point, clicking the menu item created in step 2 will open an empty tool panel:
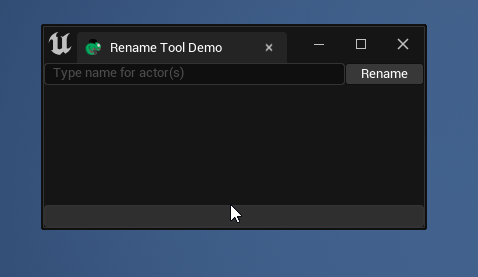
Complete the UI content
rename_tool.json(NOT COMPLETED)
{
    "TabLabel": "Rename Tool Demo",
    "InitTabSize": [380, 200],
    "InitTabPosition": [200, 200],
    "InitPyCmd": "",
    "Root":
    {
        "SVerticalBox":
        {
            "Slots": [
                {
                    "AutoHeight": true,
                    "SHorizontalBox":
                    {
                        "Slots": [
                            {
                                "SEditableTextBox":
                                {
                                    "HintText": "Type name for actor(s)",
                                    "Aka": "NameInput"
                                }
                            },
                            {
                                "AutoWidth": true,
                                "SButton": {
                                    "Text": "Rename",
                                    "OnClick": ""
                                }
                            }
                        ]
                    }
                },
                {
                    "VAlign": "Bottom",
                    "SEditableTextBox":
                    {
                        "IsReadOnly": true,
                        "Aka": "StatusBar"
                    }
                }
            ]
        }
    }
}
TIP
After modifying the UI, you can use the right-click menu on the tab to reload the interface
Key Points
- We use
"SVerticalBox"as a "container" to arrange its child widgets vertically in the"Slots". - The child widgets in the
"SVerticalBox"are an"SHorizontalBox"horizontal container (for horizontally arranging the name input widget and the button widget) and a text box"SEditableTextBox"(used as a status bar). "AutoHeight": true is used to set the child widget to "auto height", so the widget does not occupy space beyond its content."VAlign": "Bottom"is used to set the text box at the bottom to align to the bottom, always at the bottom of the window."AutoHeight"and"VAlign"actually control the"Slot {}"in the"SVerticalBox", not the"SHorizontalBox"in the"Slot {}". So, note that they are written on the outside of the"SHorizontalBox", parallel to it.- The
"SEditableTextBox"in the"SHorizontalBox"is used as the new name input box. - The text box at the end,
"SEditableTextBox", is the status bar text box, with"IsReadOnly": true. "HintText"is the content prompt for the text box when there is no input content."Aka"is the variable name for this text widget, and we will later use it to get user input content and other operations in the Python code.- The content in
"OnClick"in"SButton"is the Python code executed when the button is clicked. We'll leave it empty for now. - The boolean values in JSON are
trueandfalse, with the first letter lowercase; in Python, they have the first letter uppercase.
4. Add Tool Logic
Edit __init__.py, import the rename_tool module into our package DemoTool
__init__.py
from . import rename_tool
Edit rename_tool.py, the content is as follows
rename_tool.py
# -*- coding: utf-8 -*-
import unreal
from Utilities.Utils import Singleton

class RenameTool(metaclass=Singleton):
    def __init__(self, jsonPath:str):
        self.jsonPath = jsonPath
        self.data = unreal.PythonBPLib.get_chameleon_data(self.jsonPath)

        self.ui_name_input = "NameInput"
        self.ui_status_bar = "StatusBar"

    def on_rename_button_click(self):
        new_name = self.data.get_text(self.ui_name_input)

        selected_actors = unreal.get_editor_subsystem(unreal.EditorActorSubsystem).get_selected_level_actors()
        # if your are using UE4, use below code instead.
        # selected_actors = unreal.EditorLevelLibrary.get_selected_level_actors()
        for i, actor in enumerate(selected_actors):
            actor.set_actor_label(f"{new_name}_{i:03d}")

        self.data.set_text(self.ui_status_bar, f"{len(selected_actors)} actor(s) has been rename.")
Key Points
-
Our tool class
RenameToolinherits from the singleton class, so there is only one instance throughout the editor. -
The following initialization function is written in a patterned way. It saves the interface JSON file path passed in at initialization, and through this path, it gets an instance of ChameleonData for this tool and assigns it to
self.data. This allows the Python side to access and modify the Slate interface content throughself.data.
    def __init__(self, jsonPath:str):
        self.jsonPath = jsonPath
        self.data = unreal.PythonBPLib.get_chameleon_data(self.jsonPath)
- The value of
self.ui_name_inputis the value corresponding to the"Aka"defined inrename_tool.json.
CAUTION
The strings in "Aka" are case-sensitive.
- We get the content in the widget through the
"Aka"name of the widget,new_name = self.data.get_text(self.ui_name_input). - The methods
self.data.get_text,self.data.set_text, etc. do not need to specify the type of widget. We can use the same method to get/set the text content in other widgets (such as buttons).
Connect the UI to Python
Open rename_tool.json again and complete the "InitPyCmd" and "OnClick" on the button:
rename_tool.json
...
"InitPyCmd": "import DemoTool; chameleon_rename_tool = DemoTool.rename_tool.RenameTool(%JsonPath)",
...
- Here,
"InitPyCmd"will create an instance of theRenameTool toolwhen the interface is created, and pass the interface file path to Python. %JsonPathis an identifier that does not need to be modified and will be automatically replaced with the actual path when the tool is created.chameleon_rename_toolis the variable name holding the tool instance and is in the Python global namespace. So, you can access it from anywhere else. Therefore, we should also ensure that it is globally unique. Adding a unique prefix is a good way to do this. In fact, all of my tool instance variable names start with"chameleon_".
Extra
You can use a global tool instance manager to manage these ChameleonTool instances, to minimize the use of the global namespace as much as possible.
...
"SButton": {
    "Text": "Rename",
    "OnClick": "chameleon_rename_tool.on_rename_button_click()"
}
...
The final completed rename_tool.json
rename_tool.json
{
    "TabLabel": "Rename Tool Demo",
    "InitTabSize": [380, 200],
    "InitTabPosition": [200, 200],
    "InitPyCmd": "import DemoTool; chameleon_rename_tool = DemoTool.rename_tool.RenameTool(%JsonPath)",
    "Root":
    {
        "SVerticalBox":
        {
            "Slots": [
                {
                    "AutoHeight": true,
                    "SHorizontalBox":
                    {
                        "Slots": [
                            {
                                "SEditableTextBox":
                                {
                                    "HintText": "Type name for actor(s)",
                                    "Aka": "NameInput"
                                }
                            },
                            {
                                "AutoWidth": true,
                                "SButton": {
                                    "Text": "Rename",
                                    "OnClick": "chameleon_rename_tool.on_rename_button_click()"
                                }
                            }
                        ]
                    }
                },
                {
                    "VAlign": "Bottom",
                    "SEditableTextBox":
                    {
                        "IsReadOnly": true,
                        "Aka": "StatusBar"
                    }
                }
            ]
        }
    }
}
Summary
MenuConfig.jsondefines the menu entry position for the tool and points to the interface filerename_tool.json.- When the interface is opened, the Python code in
rename_tool.json'sInitPyCmdis executed: creating the Python tool instance and passing the interface file path. - The Python tool accesses and modifies the Slate interface content through
self.data.