How to Create Editor Modes with TAPython
Overview
What is Editor Mode
Editor Mode is a specialized editing tool framework provided by Unreal Engine that allows developers to create independent interactive environments for specific editing tasks. Common Editor Modes include:
- Landscape Editing Mode: For sculpting and modifying terrain
- Foliage Painting Mode: For painting vegetation in scenes
- Mesh Painting Mode: For painting vertex colors on models
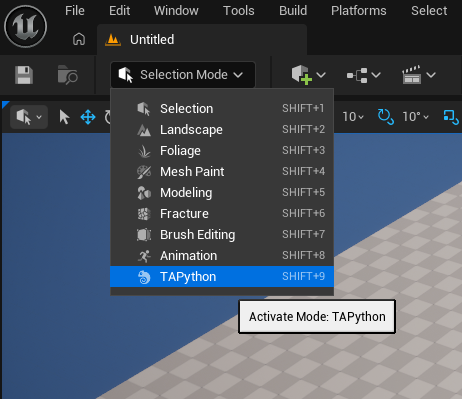
- Selection Mode: Unreal Engine's default editing mode
Advantages of TAPython Editor Mode
Starting from TAPython v1.3.0, you can quickly create custom Editor Modes using JSON for UI definition + Python for logic, without writing any C++ code, with support for live hot-reloading, greatly improving development efficiency.
Differences from Scriptable Tools Editor Mode
Unreal Engine introduced Scriptable Tools Editor Mode in version 5.2 (currently in Beta status), which allows users to create custom Editor Modes through Blueprints, but it has issues in the following areas:
-
Blueprint nodes - for complex logic, Blueprints have poor information density, maintenance, and extensibility.
-
Each "tool" in Scriptable Tools is a button, with parameters displayed as Properties; the connection between different "tools" is very weak. If you need to create a complex tool, such as one with multiple brushes that needs to manage multiple painting states and contexts, using Scriptable Tools becomes very cumbersome and difficult.
-
The base class for individual "tools" in Scriptable is predefined - for example, click support uses ClickTool, drag support uses DragTool. If a tool needs multiple interaction methods, you need to add a new C++ class for support. "Choosing the base class to inherit from at the very beginning of development" actually determines the upper limit of this tool.
TAPython, on the other hand, uses Python scripts to write logic. For advanced tools, writing and maintaining Python scripts is more convenient and efficient, and it's also very easy to call third-party libraries, facilitating integration with LLMs, AI, other DCCs, etc.
When to Use Editor Mode
We've previously created numerous Chameleon Tools with TAPython. So when do you need to use Editor Mode?
Simply put, you should consider using Editor Mode when your tool requires the following features:
- Independent Interaction Logic: Need to capture and handle mouse, keyboard, and other input events
- Custom User Interface: Need specialized UI layouts and controls
- Specific Workflow Support: Operations requiring viewport interaction, such as painting, sculpting, placement, etc.
- Viewport Overlay UI: Need to display 2D controls on the 3D viewport (such as brush previews, information tips)
A typical example is various "painting" tools. These operations need to use mouse drag operations (while dragging, the view needs to be locked), provide operation context (such as which object is being painted, etc.). Such tools are very suitable for implementation using Editor Mode.
Quick Start
Minimal Example
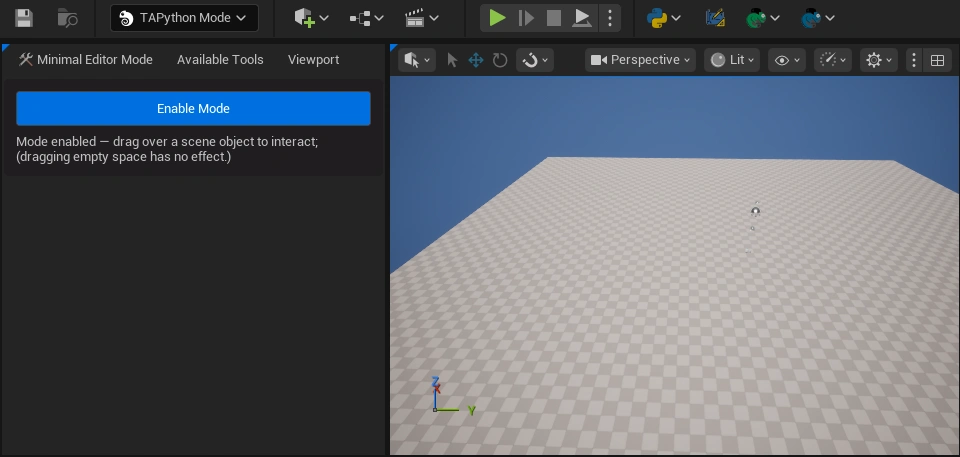
Let's start with a simplest Editor Mode that displays screen coordinates when the mouse is dragged.
For example, the following JSON file defines a minimal Editor Mode, where:
EditorModeName: Defines the display name of the editor mode (required, used to distinguish Editor Mode from regular Chameleon Tools)InitPyCmd: Python tool instance initialization commandAliases: Define alias variables to simplify subsequent Python callsEditorModeOnDrag: Callback function when mouse is draggedRoot: UI layout definition
{
"EditorModeName": "Minimal Editor Mode",
"InitPyCmd": "import EditorModeExample, importlib; importlib.reload(EditorModeExample); EditorModeExample.MinimalEditorMode.MinimalEditorMode(%JsonPath)",
"Aliases": {
"$this_tool": "EditorModeExample.MinimalEditorMode.MinimalEditorMode()"
},
"EditorModeOnDrag": "$this_tool.on_drag(%input_ray, %mouse_button, %delta_time)",
"Root": {
"SBorder": {
"BorderImage": { "Style": "FCoreStyle", "Brush": "Menu.WidgetBorder" },
"Padding": 8,
"BorderBackgroundColor": [1, 0, 1, 0.2],
"Content": {
"SVerticalBox": {
"Slots": [
{
"AutoHeight": true,
"Padding": 4,
"SCheckBox": {
"Content": {
"STextBlock": {
"Margin": [0, 10],
"Text": "Enable Mode",
"Aka": "ButtonText",
"Justification": "Center"
}
},
"CheckBoxStyle": {
"Style": "FEditorStyle",
"StyleName": "DetailsView.ChannelToggleButton"
},
"IsChecked": true,
"OnCheckStateChanged": "$this_tool.on_check_state_changed(%)"
}
},
{
"AutoHeight": true,
"Padding": 4,
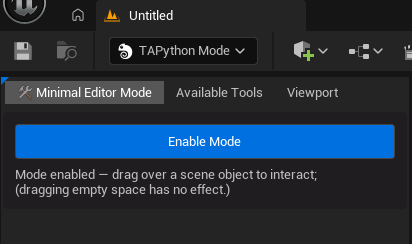
"STextBlock": {
"Text": "Mode enabled — drag over a scene object to interact; \n(dragging empty space has no effect.)",
"Aka": "StatusText"
}
}
]
}
}
}
}
}
In the Python script, we can define the logic for this tool:
"""
Minimal Editor Mode Example

A bare-bones editor mode example showing the absolute minimum required functionality:
- Enable/disable editor mode
- Capture mouse drag events
- Display cursor position
"""
import unreal
from Utilities.Utils import Singleton

class MinimalEditorMode(metaclass=Singleton):
    def __init__(self, json_path: str):
        self.json_path = json_path
        self.data: unreal.ChameleonData = unreal.PythonBPLib.get_chameleon_data(self.json_path)

    def on_drag(self, input_ray: unreal.InputDeviceRay, mouse_button: str, delta_time: float) -> None:
        screen_pos = input_ray.screen_position
        status_text = f"Dragging with {mouse_button} at ({screen_pos.x:.0f}, {screen_pos.y:.0f})"
        self.data.set_text("StatusText", status_text)
        unreal.log(status_text)

    def on_check_state_changed(self, is_enabled: bool) -> None:
        self.data.set_chameleon_editor_mode_enabled(is_enabled)

        button_text = "✓ Mode Active" if is_enabled else "Enable Mode"
        self.data.set_text("ButtonText", button_text)

        status = "Mode enabled — drag over a scene object to interact; \n(dragging empty space has no effect.)" if is_enabled else "Mode disabled"
        self.data.set_text("StatusText", status)
As you can see, the on_drag function is called when the mouse is dragged. It can obtain the mouse screen position through the passed input_ray parameter and update the text display on the interface. Other APIs used include:
- Update UI display through
self.data.set_text() - Control mode enabled status using
set_chameleon_editor_mode_enabled()
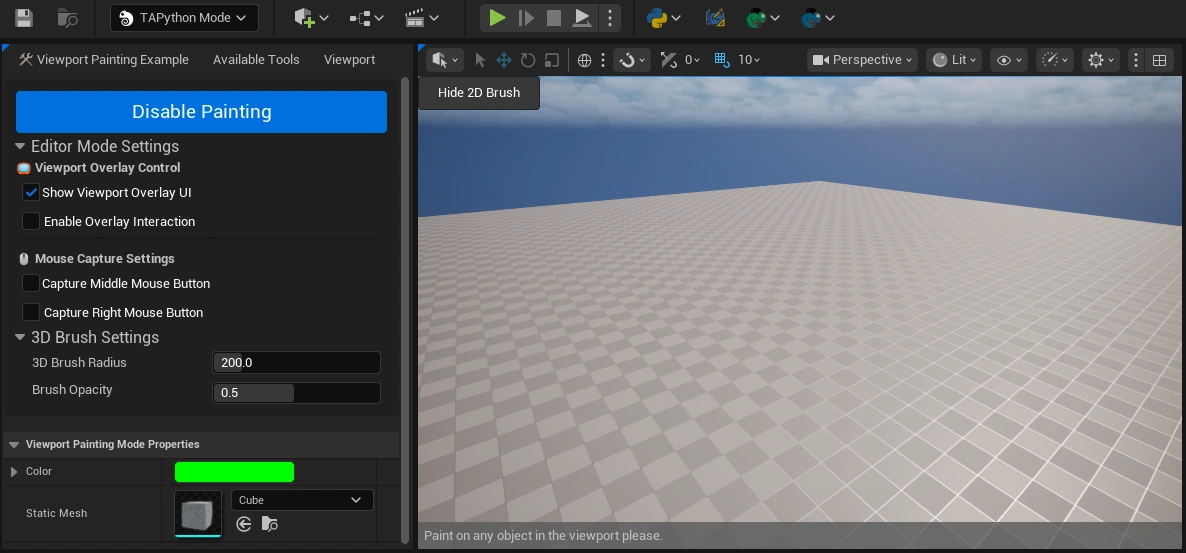
Advanced Example
In the following example, we will use a simple "painting" Editor Mode tool as an example to introduce more feature configurations and usage methods of Editor Mode. Complete examples can be found in <Your_Project>\TA\TAPython\Python\EditorModeExample or DefaultResources
Menu System
In TAPython's Editor Mode, we have three built-in menu items:
- Configurable tool menu (displayed as the current tool name)
- Available Tools
- Viewport

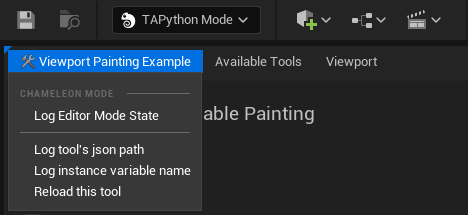
1. Tool-Specific Menu
The menu items above the separator are specific to this tool, coming from the "OnTabContextMenu" field in the tool's JSON. We can define some tool-related operation commands here.
    "OnTabContextMenu":{
        "name": "Custom Editor Mode Menu",
        "items":[
            {
                "name": "Log Editor Mode State",
                "Command": "unreal.ChameleonData.log_chameleon_editor_mode()"
            }
        ]
    },
The menu items below the separator are shared by all Editor Modes, coming from the "OnTabContextMenu" field in the global configuration file (<Your_Project>/TA/TAPython/UI/MenuConfig.json), currently shared with Chameleon Tools.
For example, the following feature, including quick Reload of tool logic, can also be used in Editor Mode.
    "OnTabContextMenu":{
        "name": "TA Python Tab",
      "items": [
        {
          "name": "Log tool's json path",
          "command": "print(%tool_path)"
        },
        {
          "name": "Log instance variable name",
          "command": "import Utilities; Utilities.Utils.guess_instance_name(%tool_path)"
        },
        {
          "name": "Reload this tool",
          "command": "unreal.ChameleonData.request_close(%tool_path); unreal.ChameleonData.launch_chameleon_tool(%tool_path)"
        }
      ]
    }
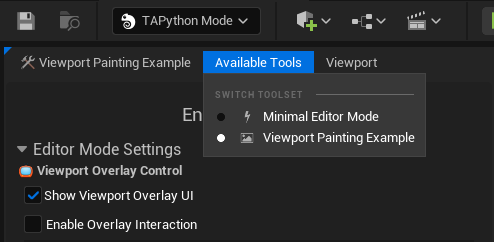
2. Available Tools Menu
A list of all available Editor Modes tools. For example, Minimal Editor Mode and Viewport Painting Example in the image below are two different Editor Mode tools. We can quickly switch between different Editor Mode tools through this menu.
TIP
TAPython will automatically search for Editor Mode files in the project, no manual configuration needed. JSON files containing the "EditorModeName" field will all be recognized as Editor Mode tools.
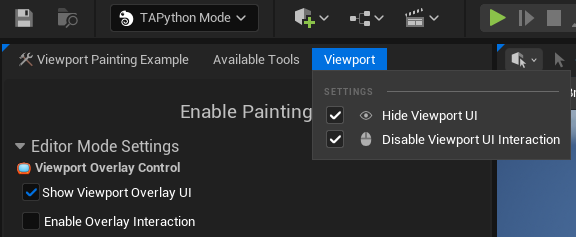
3. Viewport Menu
We can control the display and interaction behavior of viewport UI through this menu.
Viewport UI
In addition to defining UI in the main interface, we can also define UI controls in the viewport. The specific approach is to add a "ViewportUI" field in the JSON file, then define viewport UI controls in the same way as defining UI before.
    {
        "ViewportUI": {
            "SOverlay": {
                "Slots":
                [
                    ...
                ]
            }
        }
    }
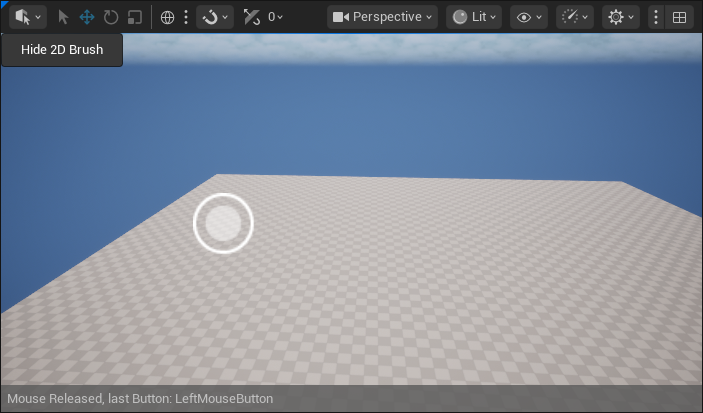
For example, in the image below, the buttons in the upper left corner of the viewport, the 2D brush in the center, and the information display in the lower right corner are all implemented through ViewportUI.
TIP
Note that Viewport UI will overlay all content in the viewport. Therefore, we need to use "AutoHeight" and "AutoWidth" more to let controls adapt to content size, or we can also use SCanvas to more flexibly control position and size.
Configuration Method
For UI controls in the viewport, the default "Viewport" menu item provides the following two options:
- Hide Viewport UI: Hide UI controls in the viewport
- Disable Viewport UI Interaction: Disable interaction response of UI controls in the viewport
Of course, we can also operate through Python commands:
# Control viewport UI show/hide
unreal.ChameleonData.set_chameleon_mode_viewport_widget_visibility(True)

# Control whether viewport UI responds to clicks
unreal.ChameleonData.set_chameleon_mode_viewport_widget_clickable(False)
These two functions are static functions of ChameleonData, so they can also be called in the tool instance through self.data.set_chameleon_mode_viewport_widget_visibility(is_visible).
Callback Events
Editor Mode supports rich input event callbacks, allowing you to precisely control interaction logic.
In addition to the mouse drag event on_drag mentioned above, Editor Mode also supports more callback events. Below is a list of currently supported events:
| Event Name | Trigger Time | Callback Parameters |
|---|---|---|
EditorModeOnMouseDown |
Mouse button pressed | %input_ray, %mouse_button, %delta_time |
EditorModeOnMouseUp |
Mouse button released | %input_ray, %mouse_button, %delta_time |
EditorModeOnDrag |
During mouse drag | %input_ray, %mouse_button, %delta_time |
EditorModeOnDragEnd |
Drag ends | %input_ray, %mouse_button, %delta_time |
EditorModeOnMouseWheel |
Mouse wheel | %wheel_delta |
EditorModeCanCapture |
Determine if input captured | %input_ray, %mouse_button |
Parameter Descriptions:
%input_ray: Structure containing mouse ray and screen coordinates, type isunreal.InputDeviceRay%mouse_button: String (optional), possible values are"LeftMouseButton","RightMouseButton","MiddleMouseButton"%delta_time: Time interval between frames (optional)
Enable/Disable Editor Mode
We can enable/disable the current Editor Mode through interface controls or Python commands. For example, in the minimal example above, we use a checkbox to control the enabling and disabling of Editor Mode.
unreal.ChameleonData.set_chameleon_editor_mode_enabled(is_enabled)
Event Execution Flow
A complete drag operation triggers in sequence:
EditorModeOnMouseDown → EditorModeOnDrag (multiple times) → EditorModeOnDragEnd → EditorModeOnMouseUp
Event Capture Control (EditorModeCanCapture)
The EditorModeCanCapture function allows us to first determine whether to capture an operation before a drag or click event is triggered, thus avoiding unnecessary event calls. For example, only interact with specific types of objects; only interact when the user is holding down a keyboard key, etc.
The EditorModeCanCapture field usually defines a call to a Python function. The three return values (True, False, None) of this function will determine whether subsequent events are captured and called:
Return Value Definitions:
True: Force capture inputFalse: Refuse to capture, event will not triggerNone: Default behavior (capture when there's a traceable object under the mouse, otherwise don't capture)
    def can_capture_mouse(self, input_ray: unreal.InputDeviceRay, mouse_button: str) -> Optional[bool]:
        # Capture input when left button is pressed
        if mouse_button == "LeftMouseButton":
            return True
        # Capture input when middle button is pressed and Ctrl key is held
        if mouse_button == "MiddleMouseButton":
            return unreal.PythonBPLib.get_modifier_keys_state().get("IsControlDown", False)
        # Keep default behavior in other cases
        return None
CAUTION
The execution of this callback function differs slightly from other Python command executions (for example, it won't output Python code error messages). It's only suitable for executing logical judgments and should not perform actual business processing.
Mouse Button Capture Settings
By default, we can only capture left mouse button input. If we need to capture other buttons (such as left button for painting, right button for erasing), we can set whether to capture middle and right button input through ChameleonData's static functions:
# Enable right button capture (for example: left button paint, right button erase)
unreal.ChameleonData.set_editor_mode_capture_right_button(True)

# Enable middle button capture
unreal.ChameleonData.set_editor_mode_capture_middle_button(True)
TIP
Note that when we capture a mouse button, the default behavior of that button (such as left button rotating the view) will be disabled. In this case, we can press the Alt key to temporarily restore the default behavior.
PropertySet
In Editor Mode, in addition to using ChameleonData to manage UI controls and states, we can also use Python classes to define the tool's PropertySet (similar to Scriptable Tools). These properties will automatically be displayed in the property panel of the tool interface, making it convenient for users to view and modify.
Defining PropertySet
The specific approach is as follows: inherit from unreal.ChameleonEditorModeToolProperties class and use the @unreal.uproperty() decorator to define properties:
@unreal.uclass()
class ViewportPaintingModeProperties(unreal.ChameleonEditorModeToolProperties):
    static_mesh = unreal.uproperty(unreal.StaticMesh)
    color = unreal.uproperty(unreal.LinearColor)
Setting Default Values
To modify default values of UClass, you need to obtain the CDO object through get_default_object(), then use set_editor_property to set property values:
set_cdo = ViewportPaintingModeProperties.get_default_object()
set_cdo.set_editor_property("color", unreal.LinearColor.GREEN)
set_cdo.set_editor_property("static_mesh", unreal.load_asset('/Engine/BasicShapes/Cube.Cube'))
Reading and Modifying Properties
In Editor Mode callback functions, we can obtain the current tool's PropertySet instance through get_editor_mode_property_set(), then use get_editor_property and set_editor_property to get and modify property values:
    def on_mouse_down(self, input_ray: unreal.InputDeviceRay, mouse_button: str) -> None:
        self.brush3d_color = self.data.get_editor_mode_property_set().get_editor_property("color")
Python API
ChameleonData New APIs (v1.3.0)
Below are the new Python APIs added in V1.3.0, mainly for Editor Mode operations and management. Other SCanvas and Project Settings related APIs can also be used in Editor Mode.
| Function Name | Description | Return Type |
|---|---|---|
get_chameleon_editor_mode_json_path() |
Get JSON file path of current Editor Mode | str |
is_chameleon_editor_mode_enabled() |
Check if Editor Mode is enabled | bool |
set_chameleon_editor_mode_enabled(enabled: bool) |
Enable/disable Editor Mode | None |
get_editor_mode_event_command(event_name: str) |
Get Python command for specified event | str |
get_editor_mode_property_set() |
Get PropertySet instance of current tool | ChameleonEditorModeToolProperties |
log_chameleon_editor_mode() |
Output current Editor Mode state to log | None |
Mouse Capture Control
| Function Name | Description | Return Type |
|---|---|---|
set_editor_mode_capture_right_button(enabled: bool) |
Set whether to capture right button | None |
get_editor_mode_capture_right_button() |
Get whether right button captured | bool |
set_editor_mode_capture_middle_button(enabled: bool) |
Set whether to capture middle button | None |
get_editor_mode_capture_middle_button() |
Get whether middle button captured | bool |
Viewport UI Control
| Function Name | Description | Return Type |
|---|---|---|
set_chameleon_mode_viewport_widget_visibility(visible: bool) |
Set viewport UI visibility | bool |
set_chameleon_mode_viewport_widget_clickable(clickable: bool) |
Set viewport UI interactability | bool |
SCanvas Element Operations
Used to precisely control the position and size of elements in viewport UI:
| Function Name | Description |
|---|---|
set_canvas_element_position(aka_name, position) |
Set Canvas element position |
get_canvas_element_position(aka_name) |
Get Canvas element position |
set_canvas_element_size(aka_name, size) |
Set Canvas element size |
get_canvas_element_size(aka_name) |
Get Canvas element size |
set_canvas_element_position_by_index(canvas_aka, index, position) |
Set element position by index |
get_canvas_element_position_by_index(canvas_aka, index) |
Get element position by index |
set_canvas_element_size_by_index(canvas_aka, index, size) |
Set element size by index |
get_canvas_element_size_by_index(canvas_aka, index) |
Get element size by index |